Advertisements
Aquatic Avenue Banner Tropica Shop Banner Fishy Business Banner
Page 1 of 3 123 LastLast
Results 1 to 20 of 60

Thread: Just another DIY ADA Cabinet build

  1. #1
    Join Date
    Dec 2008
    Posts
    205
    Feedback Score
    0
    Country
    Singapore

    Just another DIY ADA Cabinet build

    Advertisements
    Fresh n Marine aQuarium Banner

    Advertise here

    Advertise here
    Like many who enjoy the crisp clean look of ADA cabinets, I decided to get one for the new 3ft tank when my "CO" (better half) gave the go-ahead last year.

    Did a bit of running around to LFS and furniture shops to determine my best option: buy ready made, custom build or DIY.

    As I wanted a higher cabinet - 90cm vs 70cm (standard ADA), I decided to go DIY for various reasons. I literally trawled hundreds of webpages to gather information on how to DIY; there are really alot of good (and some not so good) posts available.

    Here are a few that I found very helpful, and worth a quick read if you don't want to do all the searching yourself.

    - A great video from projectaquarium to get started on top of the rest of relevant info on the DIY
    - A great thread from our sister site My-mac Forum; from where it led me to
    - This site (in Russian) where I found the dimensions (amongst other very useful info) for the various cabinets!
    (now do you believe me that I read alot? )

    Plywoods sold locally come in 4ft x 8ft sheets, so I had to redraw the dimensions. With a taller height, I ended up needing 2 4'x8' sheets, and optimised the layout for both a 3ft (90cm x 45cm x 90cm [H]) and a 2ft (60cm x 30cm x 90cm [H]) cabinets.

    Found a number of places especially in Industrial Parks where you can get the ply. I bought mine from Ban Heng Long at Jalan Berseh/Townshend Road. They will also cut it for a fee. I settled for 18mm ply and had to redo my math quickly on the spot as I had my drawings done for 16mm! (they only had 15mm as next smaller size). Went with 1 sided laminated (white) for the interior to reduce the amount of lamination/waterproofing.

    Here are all the 2 sets of plys for the 2 cabinets all cut and ready.


    Started work on the 90cm as I wanted to get that tank done first. Decided to have a 2"x2" centre "rib" of Kapur wood for added support although many designs deem it unnecessary.


    Like a true blue "kiasu" Singaporean (playing it really safe), I decided to use Dowel joints instead of just nails, here are the boards with dowels inserted.


    to be continued...

  2. #2
    Join Date
    Nov 2009
    Posts
    351
    Feedback Score
    0
    Country
    Singapore

    Thumbs up Re: Just another DIY ADA Cabinet build

    FINALLY BRO! been waiting for your update..... more picture please haha. anyway, what is the size of the dowel joint, and how do you make sure that you wouldn't drill the hole too deep and did you use any wood glue? and how much is the lamination? and do you have their contact? haha, sorry for the questions. BTW, i also read alot about the DIY of cabinet just that i didn't know where to get the raw material at a cheap price and no vehicle to get to the location T.T. i really appreciate your sharing with us.

  3. #3
    Join Date
    Dec 2008
    Posts
    205
    Feedback Score
    0
    Country
    Singapore

    Re: Just another DIY ADA Cabinet build

    Wah bro - so many questions!!

    OK, will try to address them though I must make a disclaimer: I'm a NOOB and just like tinkering DIYs. My experience is not always the best nor the only way!

    - dowels:
    For my 18mm plys, I used 8mms, though I guess 10mms may still work. How not to drill too deep? There are gadgets you can buy that attaches to the drill bit that prevents you from going too far, but I just used masking tape and "ah-ga-ration" (eye estimates) .
    Wood glue is definately required as dowel joints are meant to be GLUED (to bond with the woods for a good joint). In any case, you can't have dowel joints in ALL edges as it will be impossible to do so for adjoining sides ie once the 2 sides are joined to the base/top, you can't have the back joined by dowels to the sides! (or at least I didn't try to figure that one out). Anyway, wood glue increases the joint strength by about 30-50% (actually saw some youtube videos on tests done with/without wood glue).

    Laminates - will get round to it in my post; I spent $20 (or less I think) as I chose the 'discontinued'/sale stocks. IMHO it's not expensive - really nice ones can be had for <S$40, again in 4'x8' sheets. I highly recommend TAK products @Sungei Kadut. They have great service and workers are very helpful, even for a DIYer and 'small fry' like me buying only 1-2 sheets! :-) You can actually take the MRT/bus there and back if you don't mind the long journey to save $s. The sheets are rolled into tubes and are "manageable" for the bus/train (during off peak times of course).

    No car? No problem. I think the only main item that is bulky is the ply. If you don't mind paying for service, have the plys cut into the actual sizes. It's a bit heavy though, so a taxi home will still be necessary, unless you have an Army of help to go via bus/train.

  4. #4
    Join Date
    Dec 2008
    Posts
    205
    Feedback Score
    0
    Country
    Singapore

    Re: Just another DIY ADA Cabinet build

    Just realised that I didn't take any pictures of the assembly process - the nailing of the sides, back and bottom. Had my hands full with wood glue, balancing the clamps and getting the parts joined/nailed together and didn't want to dirty the camera.

    Anyway, the process was:
    - glue dowels+nail sides to base
    - glue dowels+nail front support to sides
    - glue+nail back to sides & base

    This is the end result:


    The left inside of the back wood was slightly damaged due to placement (bottom of stack), white laminates peeled off slightly. Not big deal as it's inside.

    Had a bit of a challenge as the plywood had flexed a little due to the rainy weather (was >2mths between time woods were purchased to build date). This was more problematic for the doors, as the flex was more obvious given there's nothing to hold it flat. Found out later from furniture shop that Doors should be made from "lumber cores" rather than "combination cores/veneer cores" Lumber Core Combination Core (pictures courtesy of paxtonwood.com)

    Next, the centre 2"x2" Kapur support was installed. Decided to remove the bottom piece as it proved to be a hassle not only for installation, but also didn't provide any functionality (it wasn't supporting anything). The top was then glued+nailed into place.


    Finally, the front piece is nailed into place. No more nailing/hammering after this. Doors are then measured to determine best fit given the slight warping of plys. 
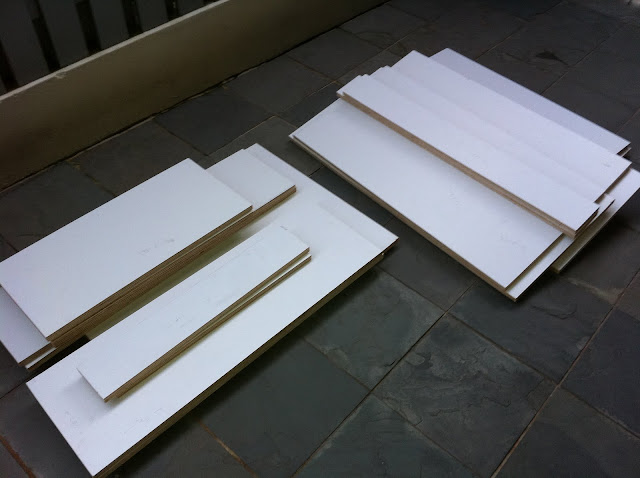
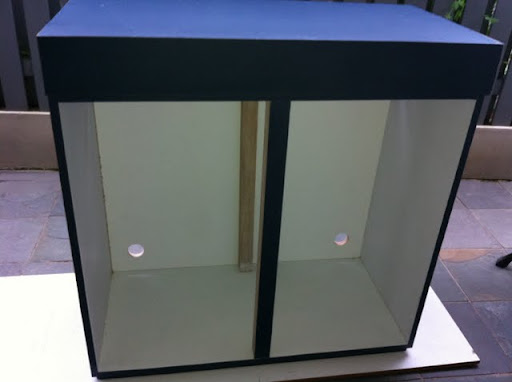
Also drilled the holes/slots at the back as I didn't intend to laminate the back. Circular holes on doors are for the hinges.
    Last edited by neverwalkalone; 22nd May 2011 at 16:58.

  5. #5
    Join Date
    Nov 2009
    Posts
    351
    Feedback Score
    0
    Country
    Singapore

    Re: Just another DIY ADA Cabinet build

    thanks for addressing my questions 
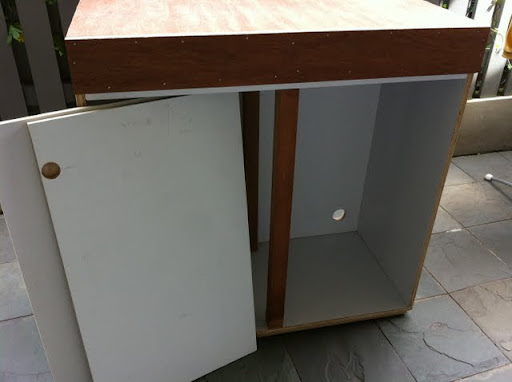
anyway, the laminates, you brought the whole sheet home and cut it yourself or ask them to cut for you to the size you want? from what i saw from the video, the guy used a machine to do that.

  6. #6
    Join Date
    Dec 2008
    Posts
    205
    Feedback Score
    0
    Country
    Singapore

    Re: Just another DIY ADA Cabinet build

    wah - you're really on top of this thread huh?! haha.. you are one step ahead. OK, I'll try to finish sharing it quickly so you may have your answers.

    I brought the whole Laminate sheet back without cutting. Here it is laid out on it's "front" (ie coloured side underneath).

    Actually had minor 'accident' carrying it, and a part of it chipped off (it's strong, but brittle, and yes - also very sharp if you are not careful). Originally thought I'd need a router also, but TAK products taught me how to do it. No need for fancy machines - of course you'd get a nicer finish if you do. You only need to use a plastic cutter you can buy from most hardware shops.
    Here's an image from the internet (eeeuser.com "copyright"?)

    The laminates should be cut to a size slightly larger than the surface covered; ideally 0.5mm border for sanding down to the edge. A long Steel ruler will be necessary/handy for use with the cutter. Looks like every time I had to deal with glue, I didn't handle my camera - so no pictures! Sorry!

    Here's the cabinet done.

    WARNING! - the laminate is VERY SHARP! I had many cuts on my arms and feet trying to move the heavy cabinet around after gluing but before sanding it down. Must agree the videos of those routers in use for this purpose certainly makes it look very easy/good!

    After laminating the box, the holes for the sides are then drilled so that the laminate is cut to the same exact shape. Didn't make a standard "half elliptical" hole as I didn't have the right tools to cut that shape. Went with a simple rectangle with round sides for the filter tubes. The steel pipes are the light fixture stand, mounted on the back rather than the sides.


    OK - here's the finished product with doors mounted


    and with the braceless tank - TADA - job complete. Not the best craftmanship, but hey, I'm happy with it cos the "CO" is happy.


    Thanks for viewing! Feel free to comment/advice. I have learnt much from this, and the 2footer will probably be better finished and done faster!

  7. #7
    Join Date
    Oct 2009
    Location
    Jurong
    Posts
    105
    Feedback Score
    1 (100%)
    Images
    2
    Country
    Singapore

    Re: Just another DIY ADA Cabinet build

    Nice DIY.
    I got another question, it the top or bottom of the top tapered? Else do you have difficulty opening the door?

  8. #8
    Join Date
    Jul 2006
    Location
    West Coast
    Posts
    467
    Feedback Score
    0
    Country
    Singapore

    Re: Just another DIY ADA Cabinet build

    Nicely done, i prefer the laminate to be black though. Is that blue you are using? Anyway thumbs up, A true red at work. YNWA!

  9. #9
    Join Date
    Dec 2008
    Posts
    205
    Feedback Score
    0
    Country
    Singapore

    Re: Just another DIY ADA Cabinet build

    The doors are not tapered. The base is actually raised from the ground with a "platform" plywood slightly smaller than the base, so it's easy to open the doors by the bottom. Incidentally, the slight flex of the doors actually makes it slightly ajar, so I can open it from that protrusion. It's a bit unsightly, but not bad enough to warrant new doors. :-)

    I did contemplate making grooves along the top n bottom edges of the door egdes, but laminating that will be a challenge. Happy to hear if there are suggestions/other options.

  10. #10
    Join Date
    Dec 2008
    Posts
    205
    Feedback Score
    0
    Country
    Singapore

    Re: Just another DIY ADA Cabinet build

    Quote Originally Posted by equidorz View Post
    Nicely done, i prefer the laminate to be black though. Is that blue you are using? Anyway thumbs up, A true red at work. YNWA!
    Thanks bro. Ya, it's slightly bluish. Wanted a black or typical ADA gun grey, but those were more pricey. Since it's my first try with laminates, I went with the discounted stock. (I'm a cheapskate. hahaha) My next 2fter may well be black or even white! :-). The colours and texture options are truly amazing.

    Good to know you're a Reds fan too! YNWA Forever! :-)
    Last edited by neverwalkalone; 22nd May 2011 at 20:48.

  11. #11
    Join Date
    Feb 2008
    Posts
    3,149
    Feedback Score
    11 (92%)
    Country
    Singapore

    Re: Just another DIY ADA Cabinet build

    Wow! You a great DIY person.

    MISSION ACCOMPLISHED!!! TIME TO LAY BACK AND RELAX!
    A Journey Of A Thousand Miles Begins With A Single Step

  12. #12
    Join Date
    Jul 2006
    Location
    West Coast
    Posts
    467
    Feedback Score
    0
    Country
    Singapore

    Re: Just another DIY ADA Cabinet build

    i see, good job nevertheless. I think you should just set up a business and sell cabinet. LOL! hope we earn a europa spot tonight! YNWA!

  13. #13
    Join Date
    Dec 2008
    Posts
    205
    Feedback Score
    0
    Country
    Singapore

    Re: Just another DIY ADA Cabinet build

    No la!! Workmanship not there (yet?) :-). Hahaha. You're too kind.

    Ya, we get into Europe tonight! :-) (see my prediction Post in the member's lounge.)

  14. #14
    Join Date
    Dec 2008
    Posts
    205
    Feedback Score
    0
    Country
    Singapore

    Re: Just another DIY ADA Cabinet build

    Quote Originally Posted by blue33 View Post
    Wow! You a great DIY person.
    Thanks Adrian. I'm just a noob. Many more Sifus out there.

    Special thanks to you for your help with the stainless steel pipes.

  15. #15
    Join Date
    Nov 2009
    Posts
    351
    Feedback Score
    0
    Country
    Singapore

    Re: Just another DIY ADA Cabinet build

    thanks for addressing all my questions. i really appreciate your sharing and your help . and NICE cabinet, if you've a better equipment i'm sure your cabinet wouldn't lose to the real thing. i'm looking forward for your next update and your FTS with plants and fishes in there.

  16. #16
    Join Date
    Dec 2008
    Posts
    205
    Feedback Score
    0
    Country
    Singapore

    Re: Just another DIY ADA Cabinet build

    Thanks bro. I hope this post helped your considerations, look forward to your DIY project.

    I'll find time to post the LED light set I built for this cabinet - ya, what's an ADA style cabinet without a cooresponding Lightset? hahaha; and of course the all important Tank setup.

  17. #17
    Join Date
    Apr 2010
    Location
    Northern Singapore
    Posts
    1,375
    Feedback Score
    48 (100%)
    Country
    Singapore

    Re: Just another DIY ADA Cabinet build

    Awesome...
    How long did you take to get this project done up?
    How much money did you spend for this entire project???

    Really 2 thumbs up!!!

  18. #18
    Join Date
    Jun 2009
    Location
    Sengkang, Fernvale
    Posts
    3,233
    Feedback Score
    20 (100%)
    Country
    Singapore

    Re: Just another DIY ADA Cabinet build

    wow, very nice detailed DIY walk-through. your ADA don't even looks like 2 feet, more like 3 feet to me.
    CRS - CRazy about Shrimps
    - Alan Phang -

    You can't explain it simply, you don't understand it (well enough )..." - Albert Einstein

  19. #19
    Join Date
    Feb 2008
    Posts
    3,149
    Feedback Score
    11 (92%)
    Country
    Singapore

    Re: Just another DIY ADA Cabinet build

    So are we going to see a ADA Aquascape soon???... me looking forward bro.

    Quote Originally Posted by neverwalkalone View Post
    Thanks bro. I hope this post helped your considerations, look forward to your DIY project.

    I'll find time to post the LED light set I built for this cabinet - ya, what's an ADA style cabinet without a cooresponding Lightset? hahaha; and of course the all important Tank setup.

    MISSION ACCOMPLISHED!!! TIME TO LAY BACK AND RELAX!
    A Journey Of A Thousand Miles Begins With A Single Step

  20. #20
    Join Date
    Dec 2008
    Posts
    205
    Feedback Score
    0
    Country
    Singapore

    Re: Just another DIY ADA Cabinet build

    Pardon the delay in responding, I've been away without Internet access.
    Thanks for all the kind comments.
    newlife:
    How long did you take to get this project done up?
    How much money did you spend for this entire project???
    The entire project took about 2 months working on weekends and a few weekdays during the year end holidays. I really took my time, though once I got going with the gluing/nailing, it was almost non-stop from there to finish up. All in all, I estimate a 20man-hour job (wood cutting/drilling/doweling/gluing/nailing/sanding/painting/cutting/laminating/final sanding... ) Alot depends on the tools and work area I guess. My wife hates a mess (and noise), so I can only do certain things at certain times of the day, PLUS clean up quickly, so it's probably delayed that way. Better keep her happy since there is still the LED light and TANK scaping projects.. heh heh).

    Cost:
    - wood = $78. (2 x18mm 4'x8' sheets + 2"x2"x10' Kapur rib + 4 'cuts' @$1/cut service fee) - bear in mind I wanted a taller cabinet @90cm (so couldn't squeeze it into a single 4x8' without 'joints'). I have enough left over for another 2ft cabinet (also 90cm tall) which was deliberate. I would think a single sheet of 4x8' will be enough for a "regular" 70cm tall cabinet. (so my guess - under $50 for ply and rib).
    - laminate : $12ea (also 4x8') - this is Discounted/Discontinued stock, so if you're buying regular ones, be prepared to pay $30-45 per sheet. I bought 2 sheets. A single sheet should be enough for a 3fter. (no need to laminate back)
    - 4 hinges (Hafele) @$2 ea (I bought 6, 2 more for the single-door 2-fter)
    - misc (nails, glue ["tiger brand" + wood glue], dowels, coarse and fine sandpaper) ~ $10 (with plenty of left overs)
    Total material cost = ~$125 (for both 3' and 2' cabinets).

    My estimate if you are only building a 3' (@70cm height) is $80-100. (with regular priced laminates).
    I'm not counting any tools and accessories cost which is substantial if you don't have/can't borrow.

    eviltrain:
    ...your ADA don't even looks like 2 feet, more like 3 feet to me.
    - you're right; it is a 3footer. I intend to build another 2fter with the remaining material.

    blue33:
    So are we going to see a ADA Aquascape soon???...
    No la, I am no way close to being able to do any "ADA" scapes, I'm just a NOOB. Have just finished planting and cycling tank now, but encountered GBA outbreak. Trying to combat it now.

    Here's a sneak peep:
    [IMG width=382 height=512]https://lh6.googleusercontent.com/-IvaqB2TAF8c/TdYDHCCLd-I/AAAAAAAAARA/uRkpujaLlA4/s512/IMG_0525.jpg[/IMG]
    Last edited by neverwalkalone; 31st May 2011 at 14:21. Reason: resize attached image

Page 1 of 3 123 LastLast

Bookmarks

Posting Permissions

  • You may not post new threads
  • You may not post replies
  • You may not post attachments
  • You may not edit your posts
  •