


 Reply With Quote
man, your tanks are really seeping poison!. What's going into the new setup? looking forward to it!


Lately i have been looking to keep more fish tanks, yet still fit them within the limited space allocated in my room... so the most efficient solution was to setup a rack system.
While i could have custom made a rack system to my specifications, the rack makers i spoke to either took too long to custom make them, quoted really high prices, or simply refused to make the rack to my particular dimensions and color specification (i wanted a powder coated light grey or at least a bare steel look).
So i decided to just shop around for ready-made shelving which could suit my requirements... and i found it at IKEA:
This is called the "Limhamn" series and its made of stainless steel. It is found at the IKEA kitchen section (its actually meant to be used in kitchens).
Since the shelving is completely made of stainless steel, it is naturally water resistant (perfect for aquariums) and the frame is bolted to the top and bottom shelf (along with a steel cross-brace), so the entire structure is quite sturdy. The middle shelves are adjustable and held with steel pins.
They come in 3 configurations: 178cm height x 36cm wide, 89cm height x 36cm wide and 89cm height x 60cm wide (all have 35cm depth).
I choose the 89cm height x 60cm wide version, as i plan to have tanks which are at least 45cm wide.
For that shelving configuration, its information label mentions that the middle shelf can take up to 25kg load. Although its probably a conservative load measurement, i will still try to keep to that weight load recommendation for the middle shelf.
Now on to the tanks...
I noticed straight away that there will be an issue with the tank placed on the middle shelf, even at the lowest height setting, if i were to use a standard 45cm wide x 30cm tall tank, there will be very little space for me to work on the tank during setup and maintenance, so i need to get a tank that is wide yet short.
After shopping around somemore, i found that the GEX Glassterior 450 could fit the dimensions i want, but it is made of normal glass... and i was looking for low-iron high clarity glass tanks.
Okay, let me elaborate why i'm abit more particular about getting low-iron high clarity glass tanks.
Ever since i got tanks made with low-iron glass, my eyes have become too accustomed to looking at high clarity tanks... so everytime i see tanks made with normal glass, i keep getting reminded of those classic Kickapoo joy juice green-tinted glass bottles.
In addition, normal glass tanks really look noticeably out of place amongst a setup with multiple low-iron glass tanks, so i have to make sure all my tanks have a consistent glass quality.
Unfortunately, low-iron glass tanks are not as common as normal glass tanks, and the current ones i see in local aquarium shops don't come in the wide but short design that i was looking for.
I was recommended to custom make it (costs alot more and have to wait), so i decided to continue my search for suitable ones.
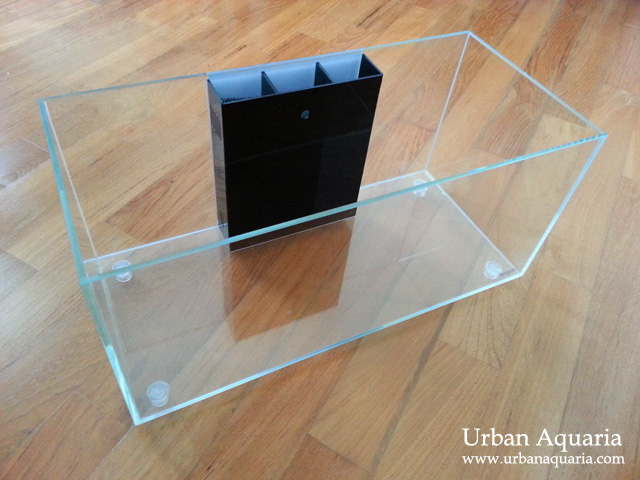
After more searching, i chanced upon this tank from Rainbow Aquarium...
Its dimensions are 48cm width, 22cm depth and 23.5cm height... and its made of low-iron high clarity glass. This is the exact wide but short glass tank that i was looking for!
The only issue was that it has a internal overflow sump (IOS) compartment built into the tank. While this is good for those who are planning to use an IOS filter system... i plan to use a canister filter with glass lily pipes, so the IOS compartment will not be used.
Luckily the IOS compartment is attached to the tank with silicon, so it can be removed.
In addition, the tank comes with plastic feet attached to the bottom with silicone. I prefer a flat bottom tank placed on a foam base sheet, so those plastic feet will also have to be removed (it'll help further reduce the tank height too).
After a few hours of tedious trimming and careful scraping of the silicone, both the IOS compartment and plastic feet are removed... a good rinse and dry, and the tank is ready!
After modification, the tank dimensions is now 48cm width x 22cm depth x 22cm height, which works out to around 23 litres in volume.
With the rack and tank done, here is what it looks like after initial setup with the room lights on...
My existing 32 litre/45cm "Tree Scape" tank is currently placed on a custom made cabinet positioned beside it.
This is what it looks like without room lights...
I will be setting up another 32 litre/45cm tank on top of the steel rack, and the 13 litre/30cm tank will be shifted (again) to another location.
There is a tall enough gap between the tank on the middle shelf and the top shelf, so its easy to access it during tank maintenance.
In this configuration, the bottom shelf still has around 30cm in height space, which is enough to fit short canister filters like the Eden 501 or the Eheim Ecco Pro 130 (i'll be using that filter for the larger tank on top).
Yes, i could have put up to 60cm wide tanks on this rack too, but i choose to stick to 45-48cm wide ones as i prefer to have some space on the sides, and the tank in the middle shelf will not be blocked by the steel frame too.
Overall, i'm very happy with how this rack setup turned out... hopefully it gives those who are keen on similar setups some good ideas too.
Last edited by Urban Aquaria; 4th Mar 2013 at 18:43.
man, your tanks are really seeping poison!
Advice from boss Felix
WoW! Your layout is really neat, even till the way you connect up your power extension...
But since your rack is stainless steel and your power extension is right at the bottom, maybe good to raise up your power extension with something insulating so that in case of water leaking or overflow, the risk is minimized...
Still planning and gathering more materials, will post updates soon.Originally Posted by diazman

Thanks!
That's good advice on the power extension... i'll raise it up on some insulation materials.
urban bro looking forward to see your new tank setup!
Inspired by Amano
Really looking forward to your next tank setup!
Need something to scratch that itchy hand of mine.
Don't act smart. Be smart!
really cool and neat setup... looking forward to your new tank setup!
It looks neat and tidy. Will be awaiting for more updates on your new setup.
The tank looks really nice! What did you use to scrape the silicone off the tank? Would love to hear your opinions on having a 45cm / 1.5 foot high vs a 45cm low in terms of aquascaping and aesthetic appeal!
Yeah, the 48cm low tank is very cool... when i saw it i almost jumped with joy.
The store rep mentioned that this particular tank has been very popular amongst shrimp keepers too (due to its wide and low shape), so it looks like many others are also using the same tank for their various setups.
To remove the silicone, i used a pen knife to cut and loosen the silicone joints, then carefully pulled the plastic parts away from the tank glass. After that i took out the blade from the pen knife and used it lengthwise to scrape away the remaining silicone residue from the glass (like scraping away algae).
I think from an aquascaping perspective, such tank shapes could perhaps be ideal for an iwagumi rock hardscape with wide grassy rolling hills... or maybe even a sand based amazon biotope with a school of corys (since they spend most of their time rooting around the sand substrate anyways, a wide and low height tank would suit them nicely).
So many possibilities!
Last edited by Urban Aquaria; 6th Mar 2013 at 01:41.
Interesting tank indeed. Where can it be bought?
Anticipating the progress of this journal.
He got the tank at Rainbow Aquarium at Serangoon North, as stated in the first post.
Nice setup Urban. I'll be watching this with interest, especially with how much weight the rack can hold eventually. If it's stable enough, this might be useful for my future projects.
Fish.. Simply Irresistable
Back to Killies... slowly.
Very nice and detail journal. Will be camping here for updates and ideal. Heh
How much did the tank cost?
Need something to scratch that itchy hand of mine.
Don't act smart. Be smart!
Correct me if i'm wrong but isn't the location at Serangoon North where Rainbow Aquarium was now currently a Shop and Save supermarket?
I got my tank directly from Rainbow Aquarium's main showroom at 78 Sungei Tengah Road.
I visited the Serangoon North area recently and Rainbow Aquarium's outlet shop seems to be taken over by other shops, and that location's phone number is also forwarded to another different LFS, so probably that outlet has either been closed or moved.
Thanks!
So far i have filled a 45cm/32 litre tank on the top shelf and the 48cm/23 litre tank on the middle shelf to test the load bearing over the past few days, both tanks and shelves are fine with no visible stress or bowing.
I would think that the top shelf can probably take up to 60cm/50-60 litre tanks quite easily too, as the side edges of a 60cm tank will actually be sitting directly on the steel frame itself (not just on the steel shelf), so it should be even more solid.
The middle shelf could also probably take much higher loads if the adjustable steel pins are replaced with steel rods cut to the right length and then slotted across both sides of the frame to support the shelf, then it'll be even stronger (only thing is it'll not be as easily adjustable, have to take the frame apart whenever you need to adjust the shelf height).
The bottom shelf is secured by steel bolts like the top shelf, so i think it can also support a 60cm tank too, perhaps a low height one so that its easier for tank maintenance.
The tank actually comes as a set with a clip-on LED light and submersible pump, all in for around $108... but since i already plan to use my own light set and canister filter, the store rep was nice enough to just sell me the tank on its own for $68.
Last edited by Urban Aquaria; 6th Mar 2013 at 15:35.
if you trust IKEA's recommended load. "Max. load/shelf: 25 kg"
http://www.ikea.com/sg/en/catalog/products/90177787/
Inspired by Amano
Thumbs up mate. Nicely done.
Eh Stormhawk, what's your budget and size of the rack you want?
VSGenesis
"The success or failure of your deeds, does not add up to the sum of your life. Your spirit cannot be weighed. Judge yourself by the intentions of your actions, and by the strength with which you faced the challenges that have stood in your way. The Universe is vast and we are so small. There is really only one thing we can ever truly control whether we are good or evil." - Oma Desala (Stargate - SG1)
http://hisstoryimmortalised.blogspot.sg/
Yeah, i was quite puzzled by the maximum shelf load of 25kg indicated on their information label... as it does not specify if that refers to the top shelf (which is attached to the frame with strong steel bolts) or the middle shelf (which is held up with steel pins).
So i figured that it has to be referring to the middle shelf as i compare it to the Expedit series wooden shelves which have a 13kg load limit, and those use shelves which are just thin pieces of wood that i could easily break with a nice drop kick... on the other hand, i'll need to be the incredible hulk to break or bend steel shelves.
Once again, thanks for highlighting the potential hazard with my power extension placement in the rack... luckily you mentioned it or else i wouldn't have thought of solving the issue.
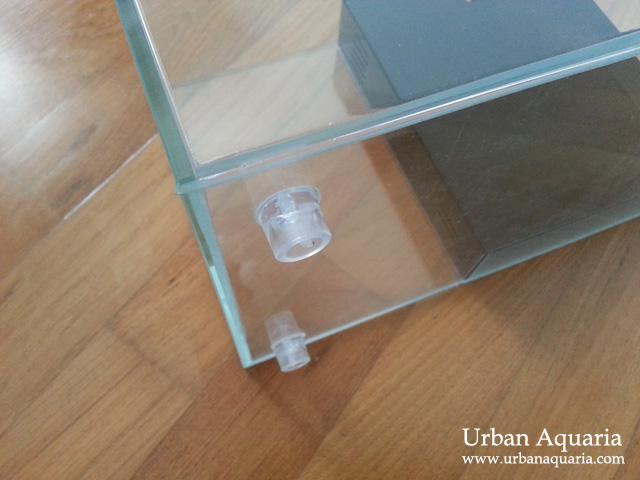
I looked around and came up with a DIY solution... two rubber door stoppers from Daiso!
As shown in the photo above, the power extension strip simply sits on the rubber door stoppers positioned at both ends so that it is insulated from the steel shelving. In addition, it is also placed at an angle on the rubber door stoppers (like on a ramp), so the switches are also now much easier to view and access too.
I have also ensured that all the wiring are positioned in a "drip loop" configuration and all the power plug holes are fully covered, so hopefully this will further help reduce the chances of any potential electrical issues in this setup.


Bookmarks