


 Reply With Quote
Neat!
Have you tested it yet? Can it withstand the pressure?


 My interest has wandered! Do U?


I hate to crack my diffuser again.... The made of some diffuser on the turning point is thin, so it is unavoidable getting crack easily.
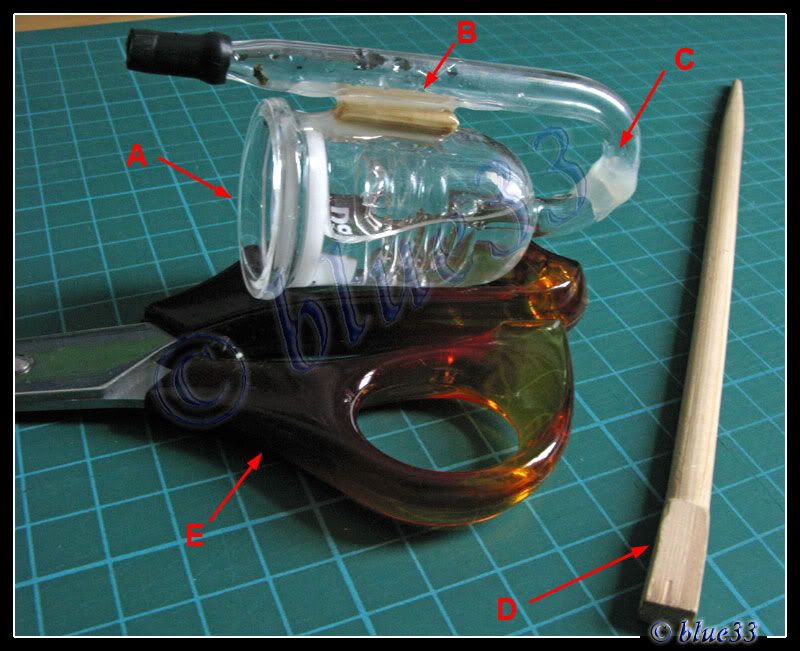
Here's my own type of servicing the crack diffuser if you dont mind the appearance. lolBelow is the picture for reference.
Item description:
A = crack Diffuser
B = cut a small piece of chopstick, glue it with epoxy to get the support on the neck
C = crack taken place, glue it with epoxy
D = Chopstick, those Japanese type is good, if dont have, use normal also can, make sure the whole wood is seal with epoxy to prevent deteriorate.
E = scissor holder as support after process done
Additional item:
Epoxy for the process
Let it cure for one day after the process.
MISSION ACCOMPLISHED!!! TIME TO LAY BACK AND RELAX!
A Journey Of A Thousand Miles Begins With A Single Step
Neat!
Have you tested it yet? Can it withstand the pressure?
- eric
My interest has wandered! Do U?
Epoxy should do fine with it, plus the support of the wood at the neck.It should work.

MISSION ACCOMPLISHED!!! TIME TO LAY BACK AND RELAX!
A Journey Of A Thousand Miles Begins With A Single Step
All the best, keep us posted
- eric
My interest has wandered! Do U?
Will test it out after i'm back from holiday.
MISSION ACCOMPLISHED!!! TIME TO LAY BACK AND RELAX!
A Journey Of A Thousand Miles Begins With A Single Step
Similarly I have used some kind of cement/clay (which needs to mix compound A and B to harden it) to permanent join two plastic CO2 diffusor. I even used this cement to fix the broken arm in one of my floor-standing lamp. It is very hard and sturdy.
My interest has wandered! Do U?
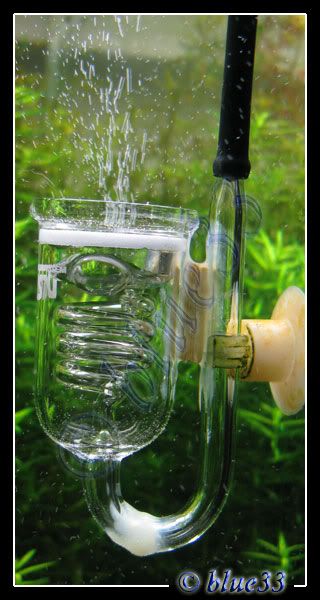
I'm back from holiday! Here's the diffuser back in ACTION!
MISSION ACCOMPLISHED!!! TIME TO LAY BACK AND RELAX!
A Journey Of A Thousand Miles Begins With A Single Step
good work.
can know if the black attachment to the inlet is the black silicone tubing?
also my diffusor has a hole in the bottom before it starts to form the glass coil inside the glass cup. How to repair the hole cos it is inside the cup and not assessible?
if u know pl enlighten cos the bubble is coming out through the hole and not going inside the glass coil. hope can understand what i am trying to ask.
thanks.
My interest has wandered! Do U?
Yes, it is the CO2 type black tube.
You dont repair the hole inside the spiral tube, the hole is for safety purpose, once the spiral coil fail its mission, the hole acts as a secondary release of CO2 to the ceramic. You may want to test on reducing the CO2 bubbles first and see whether it works on the spiral coil first. IMO.
MISSION ACCOMPLISHED!!! TIME TO LAY BACK AND RELAX!
A Journey Of A Thousand Miles Begins With A Single Step
Well done in the repair work.
- eric
thanks for your advice.Originally Posted by blue33

i presume the hole is present in all the diffusors cos i thought mine was faulty since the bubbles used to come through the spiral glass last time.
i have checked the spiral glass, but seems like there is no blockage.
Can advise on what can be wrong with it that the bubble is going through this hole at the bottom of the spiral instead of going through the spiral itself.
is there some thing i can do to make it go through the spiral glass again?
thanks
good work man
once i cracked my co2 diffuser even before i used it.
My interest has wandered! Do U?
Either you try to INCREASE the CO2 or DECREASE the CO2 and see whether it works on the spiral coil, if it still failed, it still can work except the bubbles counter on the spiral dont work, actually you still can read the bubbles from the secondary hole if you notice it. Hope it helps!
MISSION ACCOMPLISHED!!! TIME TO LAY BACK AND RELAX!
A Journey Of A Thousand Miles Begins With A Single Step
My interest has wandered! Do U?
Thanks bro! It happened for me on this set, totally new, crack before i use.
MISSION ACCOMPLISHED!!! TIME TO LAY BACK AND RELAX!
A Journey Of A Thousand Miles Begins With A Single Step
 Posting Permissions


Bookmarks