


 Reply With Quote
Very innovative! But the stand holder Could be improve. A little not safe as it might topple easily.
Anyway how many led light bulbs and how many watts is this?


Hi fellow DIY'ers,
As part of a larger project, I decided to change out the twin tubes T8 light set for some LED tubes that can be more energy saving, easier to slide back and forth and able to fit next to the overflow pipes.
My main problem is that I'm using 3ft tubes for a 4ft tank, partly because 1/2 a ft on both sides do not really need the light and partly because the 4ft tubes are out of stock
It's a really rushed and ghetto DIY so some parts may not look pretty but it can be done real quick and easy!
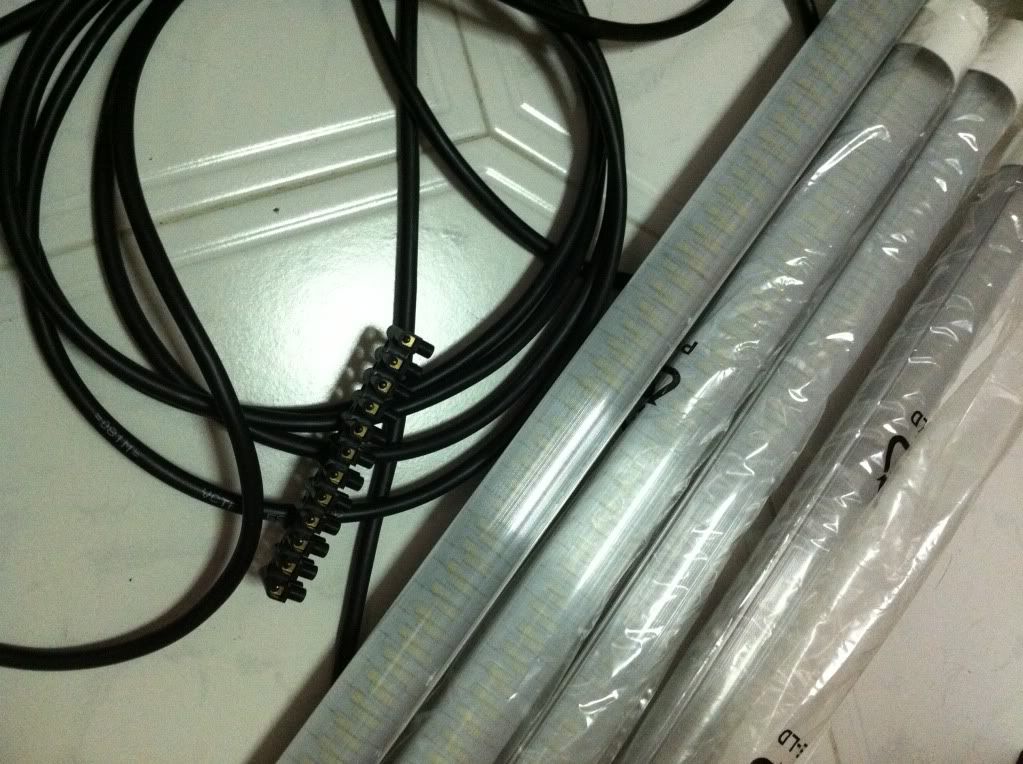
The stuff:
What I bought from Inware. The wire came with a black and white insulated cable inside.
1 inch PVC elbow and PVC pipe ($1.20 for an elbow and about $1 a foot for pipe)
Remember to pick the PVC pipe with the correct internal diameter. If in doubt, bring the LED tube.
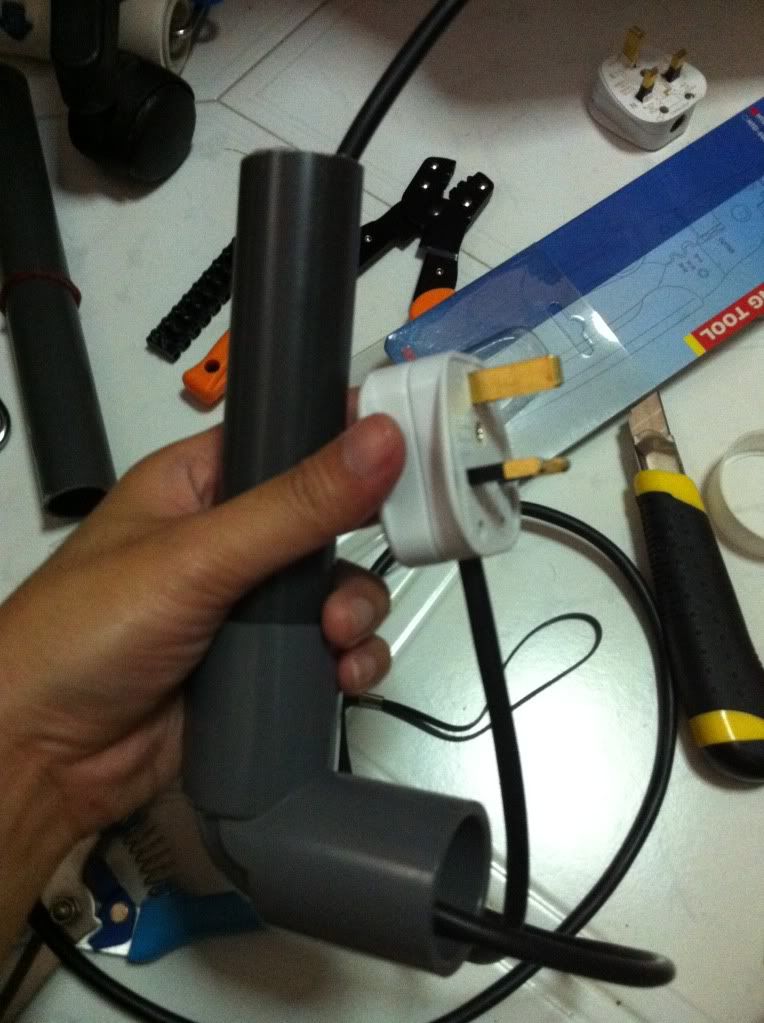
First step, connect the 3 pin plug head to one end of the wire.
Step 2, measure how long you want the plug to reach and cut to size.
Step 3, measure and cut the required PVC length to insert into the elbow. If the tube is the same length as the tank, then just a tiny short PVC to hold the LED tube will do.
I used a $2 daiso hacksaw to cut, but you can also ask the hardware shop to cut for you.
Step 4, strip the end of the wire and run it through the elbow and PVC pipe.
Step 5, As I need to power 2 tubes, I measured, stripped and twist the 2 ends of another length of wire to the first.
Step 6, push in and screw tight the ends of the wires into one side of the connectors.
I forgot to take a picture of the connector but it looks like this:
Step 7, Attach and screw tight the other side of the connectors onto the 2 pins on the LED tubes. The tubes are a newer batch according to the vendor, so both the live and neutral pins are on 1 side. The pins on the other end are dummy pins. So unlike older tubes, there's no need to run another wire across the tube!
Step 8, Push the led tube into the PVC pipe and the PVC pipe into the elbow. If its loose, use whatever means you can find to "fattening" the LED tube's end so it'll grip the PVC pipe. I used plumber's tape and then scotchtaped it to be safe.
Step 9, Do the same on the dummy pins side of the LED tubes. Double check the length so that both elbows will sit on the glass edges of the tank.
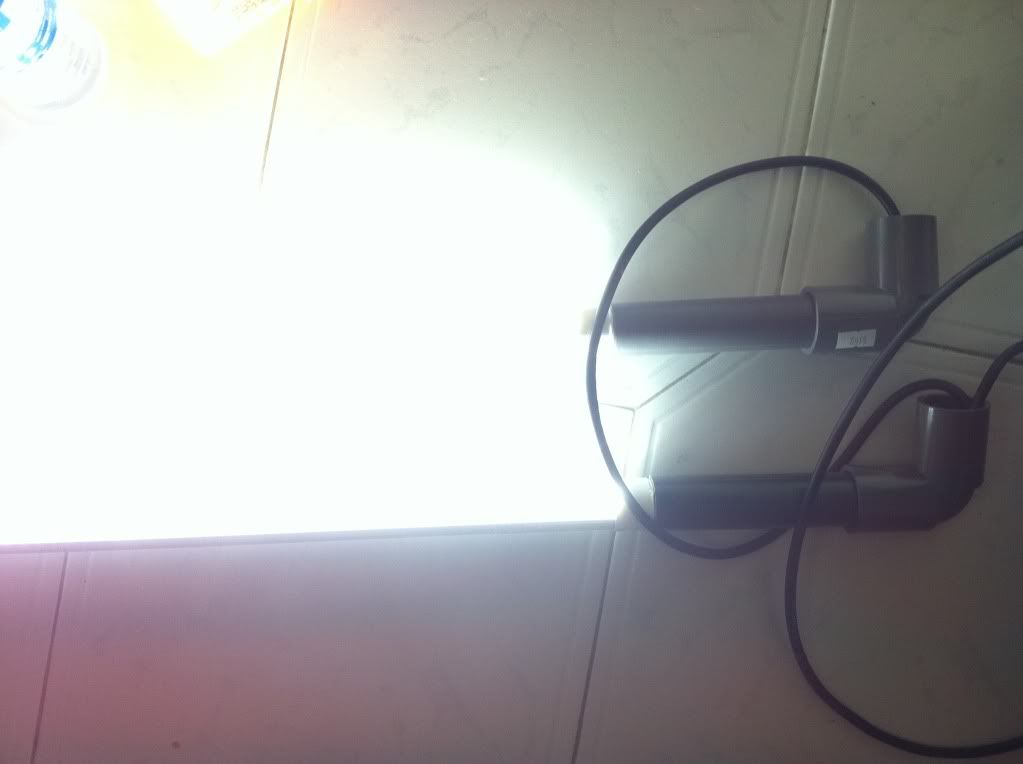
Step 10, Test the lights!
Another shot with the camera white balance dimmed
Step 11, Put the lights on the tank and after adjusting, cut a small piece of, erm, anything, and tape it to the side/bottom of the PVC elbow at the dummy end to prevent that side from sliding and falling into the tank. I used a piece of hose cut into half. The wires coming out of the elbow at the live end of the LED would already prevent the elbow from sliding into the tank so no worries there.
And its Done!
Before
After
Note that as I had 1/2 a foot of PVC on both sides to extend the LED tube, the stand is slightly saggy
My advice is to use a full length tube so there's no sag to worry about. Now that I think about it, a 4ft tube may push the PVC elbow totally past the glass edges...hmmm, I'm sure there's an easy fix by just getting some PVC pipe connectors and getting innovative!
Also, I'm sure there're many improvements that can be made, such as spraying the PVC metallic sliver!
Please give any comments and advice for improvements. Thanks!
Last edited by Navanod; 5th Feb 2012 at 00:09.
Very innovative! But the stand holder Could be improve. A little not safe as it might topple easily.
Anyway how many led light bulbs and how many watts is this?
Just a suggestion ,add 1 more pvc pipe on both side and join to the elbow, this extra part u might need to cut through in between of that pipe the thickness of ur glass and let it sit in between of the glass ( maybe an inch or more which u prefer ).
with both side sit in will be much safer than just on the glass edge . Hope it helps
I had similar concerns but its surprisingly sturdy, probably due to the weight of the wires on one end pulling it down. I actually wanted to add a bigger base or make a T joint to join the 2 tubes so it forms a "U" shape stand that'll never topple. Hehe, we shall see. Modifications can be done anytime since everything can be taken apart easily.Originally Posted by huizhong

That was actually the initial plan, to cut a notch the size of the glass. But I don't have the tools (coping saw?) to make a nice notch and opted to just stick things to the base for the same results. Will use stronger 3M tape once I get my hands on the roll that missing.
Get those metal hand saw from DIY store will do the trick as u can cut to the dimension of the thickness of the glass and use a pliers to break it .
Yes...that may be a good way indeed...thanks for the tip, I'll update again if I succeed.
No problem bro ,looking forward for your next update . Cheers !
Navanod, can share the price range and vendor with me?
Learning the hardway, not the highway.
Photo Blog - impervious-endeavors.blogspot.com
Semi-Active currently
"if he cant be bothered to take the time to write his question properly, why should I take the time to answer him."
As what amkalvin said, cut a groove or notch on the PVC elbows of the same width as the glass panels at the point that meet the glass edge and you can fit them easily on the glass panels itself with little issues. A little wider would be good so the elbows got some "wiggle" room. Too tight and it defeats the purpose.
I think you can cut them with a normal saw, then snap off the part at the base with a pair of pliers. Crude but the easiest way. Problem is getting the two notches to be in a straight line.
This method is great. Makes use of spare bits and bobs instead of spending on a fancy unit. Nava, perhaps you can DIY a reflector to add to this project.
Fish.. Simply Irresistable
Back to Killies... slowly.
If he got it from Inware & the end-product is a T8, most likely is one of the versions listed at inled. Since he's usig 3-foot T8 tubes, the wattage consumed should be 13W for 192 LEDs (gotten the figures off the data sheet), which equates to 0.067W per LED.
I strongly recommand to take the light set from inLed. My 4feet T8 led brightness is like 2*54 watt t5ho.its great for moss, but for light demanding plants im not too sure lo.
Send from my GT-P1000 (Overcome 7 Series v4.0.0)
CRS - CRazy about Shrimps
- Alan Phang -
You can't explain it simply, you don't understand it (well enough )..." - Albert Einstein
Actually, what happens if moss, i.e. even fissidens, are exposed to intense light? I also feel that the T8-converted LED from Inwares ("InLED") are not bad, but will it be able to grow HC?
I think if you are cutting the groove into the pipe, it might be wiser if its cut deeper. You can then drill two holes on the outside and get a plastic bolt on each side of the groove and screw it in. Very much like how your previous light would work. It's better to err on the side of caution. IMHO.
Need something to scratch that itchy hand of mine.
Don't act smart. Be smart!
The tubes are $35 each, and I also bought some cable from the vendor (Inwares). He gave me the wire connectors together with the cable.
The problem is, the plastic of the elbow joint is considerably thicker and harder than the normal PVC pipes and is very hard to work with with my limited tools.
I also need it to sit higher so cutting a slit will actually reduce the height...I'm still working on ideas to improve stability without too much cutting! Hehe.
Erm, LEDs don't really benefit from reflectors. Instead the plastic tube acts as a lens to diffuse the light so it can cover a wider area.
I'll keep that idea in mind but as mentioned above, its mighty hard to cut the elbow joint's plastic. Maybe extending it with a short length of PVC and cutting that PVC would work?
Thanks mate. Will further check with supplier changing my 2 feet lightset
Learning the hardway, not the highway.
Photo Blog - impervious-endeavors.blogspot.com
Semi-Active currently
"if he cant be bothered to take the time to write his question properly, why should I take the time to answer him."
Just thinking out of the box.
1. If you have an electric, find a drill bit just about thicker than your glass and start drilling into the edge of your elbow pipe and then work your way up. You can adjust the size and height accordingly.
2. Find a PVC pipe that fits snugly into the connector. You should be able to cut through this, though of course easy to cut plastic would mean thin plastic so you might want to weight your options here.
3. Alternatively, (use a spare elbow joint for this experiment) stuff short length cuts of your hose piping (you should be able to get them at different thickness/diameter) and stuff a couple of them into the pipe with 2 strips of them longer the rest. These 2 will act as the support while the entire bunch is bundle with a rubber band or silicon together (since it is hidden by the elbow joint). [refer to picture as shown]
Attachment 28593
Pardon the lousy drawing - its the best I can do.
Anyway, experiment around. Better to be safe! Have fun!!
Need something to scratch that itchy hand of mine.
Don't act smart. Be smart!
Nava, fit in a short piece of PVC with thinner plastic into the bottom end of the elbow joint, and cut the notch on that piece. Increases the height of the light slightly but gives you an easier time to cut the notch. Besides, if the notch piece cracks after a long time, just replace with another piece if you have spare PVC pipes lying about.
The top two tubes shown in your 3rd pic in the first post would be the best choices for this notch support piece.
Fish.. Simply Irresistable
Back to Killies... slowly.
 Posting Permissions


Bookmarks